How to put your own buttons on your online shop
Default buttons are not bad
Paypal default buttons are written in blue, against a yellow background. They are well-known globally and help making your online shop look reliable. For most cases, they do the job pretty well and you do not need to bother.
You can customize Paypal buttons on your website
If you don't like Paypal buttons or want to unify the design or colors of the buttons with the theme of your website, you may want to customize the image of the buttons.
Note: If you change the graphic design of the Add to Cart button, you should probably also modify the View Cart button.
To change the look of a Paypal button, please follow these steps:
1. Create the button image
You can use a graphics software (e.g. Photoshop, GIMP) or get your icon from an image bank.
>>> Browse the images on 123RF.com
To look good on your online shop, the size of the image will probably need tweaking. As a starting point, use a height of 26 pixels for your image (this is the height of Paypal standard buttons).
2. Save the image file
Both gif and png formats are supported. Please follow the below file naming convention:
► Donate button: btn-donate.gif or btn-donate.png
► Buy Now button: btn-buynow.gif or btn-buynow.png
► Add to Cart button: btn-cart.gif or btn-cart.png
► View cart button: btn-viewcart.gif or btn-viewcart.png
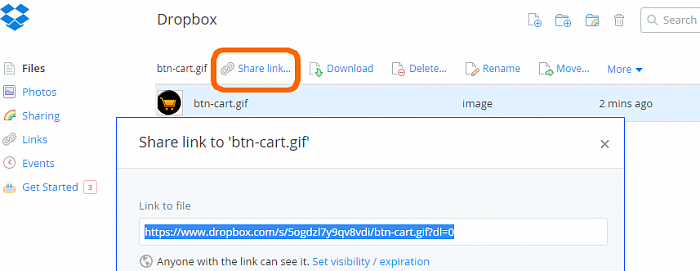
3. Store the file on your Dropbox
Use the free file hosting solution Dropbox to put your image file online.
>>> Click here to read the Wikipedia page on Dropbox service.
Then, share it so that your SimDif website can access to it, and copy the sharing link.
4. Tweak the button code to point to the new image file
Now, open SimDif website builder and click on the button placeholder. In the button code, select the URL (web address) located just after <input type="image" src=
and starting with:
https://www.paypalobjects.com/
1. Overwrite this URL with Dropbox link, which should start with: https://www.dropbox.com
2. Then replace www with dl in the above so that the URL starts with: https://dl.dropbox.com
3. Click on Check code button twice and you are done.
Congratulations! You have successfully installed your own custom payment button on your online shop. You should repeat the above procedure for each Paypal buttons you need to change.
Thanks a lot to Nathan Swartz
Note: Thanks a lot to Nathan Swartz for his instructive blog, and in particular his article about customizing Paypal buttons with Dropbox.


